Showing posts with label DIY. Show all posts

Tuesday, March 11, 2014

Painting Date

This Spring Break I decided (last minute) to visit Gerred in Texas again! Come to think of it I've spent each Spring Break in a different state to visit him. I spent 2011 in Albuquerque, New Mexico, 2012 in Washington D.C. (and a little day trip to Connecticut for Katie's Maury Bachelorette Party), 2013 in Pensacola, Florida, 2014 in Corpus Chrisi, Texas. I guess seeing the world is certainly one of the perks I can check off for being a Navy wife. Speaking of perks, we went on a date last night and we had a blast.

Gerred found a groupon for Pop Goes the Easel! a painting BYOB party place where you learn to paint with a drink in your hand. Gerred and I chose whiskey sours in the always respectful Bubba Cup. Let me tell you what, it made him in artist. Maybe it was the whiskey or maybe the sour, but he was painting like Van Gogh for someone claiming to have zero artistic talent.


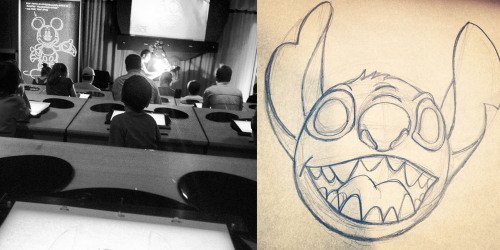
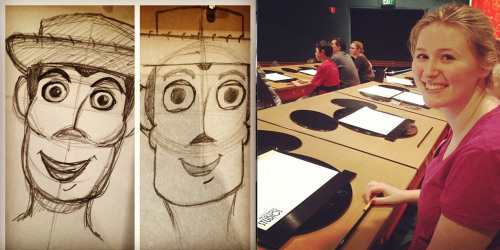
Actually the whole time I was reminded of our last artistic endeavor in Disney World. We drew Woody and Stitch. Let me tell you he's come a long way since drawing "the cowboy who has seen things."


Our instructor, taught everyone how to paint a seaside landscape. But I saw this painting of an anchor on the wall and I asked (since there were only 8 attendants) if I could try my hand at that. She said yes and made sure to check up on me in between the explanations of how to make a cloud which was seriously channeling up several images of Bob Ross in my head.

[via]

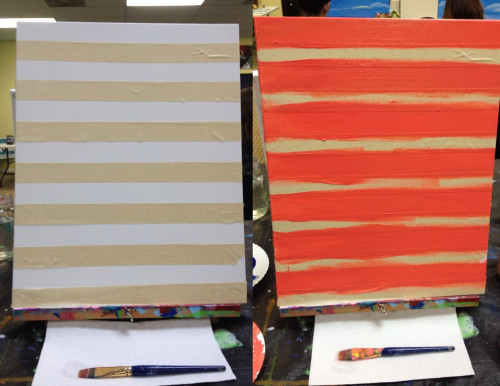
Anyways, I got a pretty neat how to course on how to paint a striped background (tape it, paint it, dry it) and free styled from then on. 


I loved our end products and would definitely do this in the future. Maybe when I reach my dream goal in life of joining a wine club fronting as a book club I'll do this again.


 photo signature_zps424e0a05.jpg

Wednesday, June 5, 2013

DIY Laundry Board

For the longest time my mom would and I would put the laundry out to dry on top of couches, chairs, tables. They would wind up with plenty of orange cat hair on them and no one would be able to sit. I decided one day that this whole issue could be avoided if we jut had a designated clothes line or laundry rack. I began to look them up with my parents and found a beautiful one, but it cost way way too much. So we thought back to the DIY headboard project we did and thought "hey, why don't we just make our own laundry board?"


Materials
2 chains
1 beat board
4 wooden planks
1 clasp
2 hinges
12 dowel rods


First assemble it...yes I came into the game too late for this one. Basically, you need to build a frame that measures exactly to the beat board. Then space out the dowel rods throughout and secure them in place.  Attach hinges at the base to connect the wooden frame and the beat board so that they open like a book.  Once done, paint the wood.


The second task is to attach the chains so that when extended the board can stay up to dry the clothes. Lastly attache a clasp on the side so that you can keep the board lying against the wall when you're laundry isn't being dried. I'm not sure when that time would be though. It seems that laundry is a constant.


Then pull out that laundry board and hang your clothes on it!
 photo signature_zps424e0a05.jpg

Wednesday, March 6, 2013

DIY Tie-Dye: Rubbing Alcohol & Sharpies

One of the assignments for my Educational Psychology class was to come up with a dream lesson (that used teaching strategies from three theorists) and teach the lesson to the class. My partner and I decided that we would do tie-dye. We set off in search of a tie-dye kit all around Chestertown, but no such luck. Roses (K-mart's sad cousin) and Wallgreens did not have any. We were so dead set on tie-dying so we knew there must be another way to tie dye. That's when the power of Pinterest came into play and we found a different tie-dying technique, using rubbing alcohol and sharpies. We'd never tried it before but we were sure going to learn that night.


Materials
White T-Shirt
Rubbing Alcohol
Straws (or any sort of dropper)
Plastic Cups
Rubber Bands
Colored Sharpies


Step 1
Lay shirt out flat and pick a spot. Place cup under shirtSecure rubber band around rim of cup, holding shirt in place.

Step 2
 Draw a design on the stretched fabric and drop rubbing alcohol over design.


The rubbing alcohol will expand and the colors will blend together to give it the tie-dye feel.


Step 4
Repeat until you are happy with your shirt. Don’t forget to let it dry before you wear it!

And voila, you're very own tie-dye'd shirt. Full of different colors, designs and patterns made with things you can find around your house.

Shannon

Monday, July 23, 2012

Cornhole

I'm not sure if this is an Eastern Shore thing, but if you haven't played Cornhole you should because it is quite possibly the best BBQ/Beach game ever. It's fun, it's simple, you just toss the bean bag on the other board, there's points and sometimes the wind makes it difficult. Anyways, the rules of the game aside, last year Dad and I decided to make our own Cornhole Boards. Kirby Cornhole Boards.


Dad first built the boards and then we decorated them together. He first designed the graphic and then we taped it, cut it out, and then spraypainted the whole thing before peeling away the tape and paper to reveal the super design.It's great playing tournaments of Cornhole with the family at the beach especially when we get to show off the boards we made ourselves.

Shannon

Saturday, May 19, 2012

DIY Tissue Paper Flower Bouquet

With Katie's big day is coming up so Katie, Andrea, and I got together for another day full of wedding DIY. Back in March we decided to make our own shirts for the Maury Show Bachelorette Party and they turned out so well that we became fans of the day and got to meet Maury. So DIY is working for us and this time we worked on making a tissue paper flower bouquet for the wedding.

Materials
Tissue Paper
Scissors
Wire
Tape
Flower Tape
Ribbon

1. Cut three sheets of tissue paper (hot dog so that they are long.) Layer on top of one another.
 2. Fan fold them.
3. Wrap Wire around the middle and twist around the bottom.
4. Cut pointy or round edges for the side.
5. Fan the edges out and pull up each layer one at a time towards the center.


Once all the layers have been fluffed out, it should start to look like a flower. They look really weird until the very end.


We made some blue and yellow ones for the bridesmaid bouquets, and then Andrea wrapped the flower tape and ribbon along the wire stems. These look adorable and allergy free!

Can't wait to pose with these in pictures for the wedding!

Shannon


Thursday, April 12, 2012

Caine's Arcade

"9 year old Caine Monroy, who built an elaborate cardboard arcade inside his dad’s used auto parts store, is about to have the best day of his life."

This boy's imagination is wonderful. Ah, to build Caine's Arcade all of that out of carboard and never give up. Wow, just wow.


Honestly, there need to be more people like these three men:

1. More creative minds imagining greater possibilites and having fun doing it.
2. Parents encouraging and believing in their children's creativity.
3. Outsiders that reach out, help, and make a kid's day.

Think outside the box today!

Shannon

Thursday, March 29, 2012

On the Go Emergency Kit

Inspired by the Miniemergency Kit's for Her, I've decided to create my own emergency kit of roughly 18 items to keep in my purse for those "oh no" moments while on the go. Remember, not all these items are necessary. I don't have the mini sewing kit in my bag, but I put it out for those who may want that in theirs.


1.  Clinique Make-up Bag - Get a good pencil pouch or make-up bag to fill everything in.

2. Band-Aids - This kit is full of band-aids in different sizes as well as cleansing wipes and gauze pads.

3. Secret Deodorant - Forget to put on deodorant this morning? No problem.

4. Tampon - Be the girl with the tampons for your friends in need.

5. Tide To Go - You never know when you might get splashed with mud or food and have to clean it up.

6. Pen - For when you're unexpectedly in need of one at an event.

7. Tic Tac - Fresh breath instantly.

8. Floss - When food is awkwardly stuck in your teeth.

9. Hair Ties & Bobby Pins - Simple problem hair solutions.

10. Travel Kleenex - Use a kleenex, not your sleeve.

11. Banana Boat Spray Sunscreen - I have the spray instead of the lotion so it doesn't leak. The sunscreen is arguably the most important part of the kit (especially for me.)

12. Mini Sewing Kit - This is certainly optional, since I don't feel like too many people need to sew on the go. But the scissors may come in handy.

13. Earring Backs - How many times have you lost the back of an earring? Backs of erasers work perfectly as earring backs too.

14. Ibuprofen - Great for long car rides or concerts.

15. Nail File - The one I have came out of my February Birchbox

16. Pocket Size Hand Sanitizer - For all the gross surfaces of the world.

17. Burt's Bees Lip Balm - Chapped lips are terribly, carry this around and save your lips.

18. Ponds Clean Sweep Towelettes - Take care of a running mascara or a sweaty face.


Remember to always be prepared! If you have any suggestions to add to the On the Go Emergency Kit, just comment below.

Shannon

Monday, March 19, 2012

DIY Headboard

My bed is just a mattress without a frame or headboard of any sort. For awhile now I've been discussing with my parents a way to actually have a headboard. I've been eyeing Pottery Barn's Raleigh Upholstered Camelback Bed particularly for the neutral color and studs around the trim. The bed happens to be $1,399, but all of us agreed we'd go with the DIY approach since my Dad is an awesome handyman. Here's the step by step tutorial on how we saved $1279 by making our own headboard.

Materials
2 yd Suede Fabric
2 yd Foam
72" Batting
6' Plywood
120 Designer Studs
Wire Rod
Measuring Tape
Pencil
Jigsaw
Table Saw
Sander
Electric Meat Cutter
Staple Gun
Hammer
Plier


Step 1: Measure the width of the bed (6 ft. for this Queen Bed.) Mark the center of the board. Use a green wiring rod to create half the "camelback"stencil for plywood. Cut out stencil with jigsaw. Flip it over and trace on other side.

Step 2: Use a jigsaw to cut along the line created by the stencil.

Step 3: Sand down the edges so it's safe to sleep near.
Step 4: Hold up foam next to cut out. Staple to top and bottom so it stays. Use a meat cutter (one of Grandmama's old tricks since the meat cutter only cuts the foam) and cut the foam along the plywood.

It should start to look like this.

Step 5: Wrap the batting over the foam headboard. Stable it around without damaging the foam. Cut the excess batting away.

Step 6: Iron the fabric (Thanks Mom.) Drape the fabric over the frame. Staple below the foam so the fabric is tight.

Step 7: Measure out each inch and mark it along the border of the frame. Hammer in each stud on each mark with a plier.

Here's how the nailhead border should look like in the end.

The finished project in my room.

I actually love the headboard we made a lot better than the expensive Pottery Barn headboard since mine is an awesome camel suede.

Sweet Dreams are made of these!

Shannon

P.S. I am well aware that my comforter is from Twilight. I actually did not know it was when I first got it.

Saturday, March 10, 2012

DIY Bachelorette Shirts

If you don't already know, my BFF Katie is getting married in June and I just so happen to be a Bridesmaid in her wedding. So for Katie's Bachelorette Party, her Maid of Honor/Sister, Andrea, planned a trip to Connecticut for us to go see the Maury Show. It was absolutely fun and there will certainly be a blog post about it to come. But for now I'd like to talk about the bright pink shirts we made for the occasion.

We took a trip to Michaels Arts & Crafts and picked up the necessary materials:
Pink shirts
Sponge brushes
Stencils
Black glitter fabric paint
Silver glitter fabric paint

I first took the stencils and taped them on the shirt and dabbed on the paint.

But afterward the letters fror Maid looked like a prison shirt so I took the second stencil and put bride over top.

It looked a whole lot better once I did that.


Here's the end result. We looked great that day and these shirts got us a lot of privileges!

Shannon

Monday, February 27, 2012

Citrus Face Mask

With all the stress of course work this past week it was high time for a face mask day. Sarah and I tried using one of the DIY face mask recipes I've collected on Pinterest, but found that we didn't have some the ingredients the recipe called for on hand in the dorm. By substitution and guess work we actually came up with a wonderful recipe that left our skin smooth and smelling heavenly.


Ingredients
1 tbsp. honey
1 cup brown sugar
1/2 cup of Oatmeal
1/4 cup face lotion
1 tsp. of Lemon Juice
1/2 an Orange


1. Add honey, brown sugar, and oatmeal together in a bowl.
2. Mix in face lotion.
3. Squeeze lemon and orange in. Stir.
4. Apply to face.

The mixture started off with just Sarah and me.


But quickly moved around the hall to include Caitie and Christine.

and Jade, Amanda, and Maddie.

Also I can't end this post without Amanda's "Neutrogena" face. P.S. She'll be the RA of 2nd Floor next year and will be moving into my room. So excited for her.

This is a great activity to do with a lot of girls on a Friday night. Just pop on a girly movie like Pride and Prejudice and paint your nails.

Shannon

Friday, February 24, 2012

Heating Pad

Whenever I had an upset stomach or an aching pain my Mom would always microwave a heating pad and tell me to put it on whatever hurts and it always worked like a charm. Now I had mine with me at college until the other day when mine died. See, the heating pad was on it's death bed really since it wasn't retaining heat and absorbed certain microwave smells. So when it began to spark and smoke I cut my losses and threw it in the sink. Now begins my journey in looking for a new heating pad.
Note that I am not looking for plug in heating pads. I've tried them before when I was little and they tended to create sparks and do not hit full heat potential.

Microwavable Aeromatherapy Heating Pads are the way to go. They're easy, you just throw them into the microwave for two minutes and you're set. I checked Etsy and they have some great options to choose from.


How adorable are these Crampcakes? Just the fact these look like cupcakes would make me feel better, but they're made with peppermint, eucalyptus, and lavender to so they smell great. These would be great for kids.

This heating pad is perfect for wrapping around knees, necks, and bellies. The fabric is cute and reversible and inside the bag is lavender imported from France!

And if you're a crafty talented sewer you could even attempt making your own heating pad. With just some fabric, flax seed, and lavender you'd probably be able to do it.

Does anyone else use heating pads or have some cool ones of you're own? Share them with me.

Shannon


Wednesday, February 1, 2012

Valentines Day: Gifts

Remember my Christmas Gift Guide for the Boyfriend? Well I'm here to reinstate a Valentines Day one. I think Valentines seems to be a time when the gifts are very obvious for gentlemen to get their ladies (flowers, chocolate, jewelry etc.) That girls need their own guide that breaks down the Valentines gifts for guys. I'd like to preface that sometimes you really don't need to give a Valentines "gift." Quirky little things that make him laugh or smile work just as well as the cologne you want to give him. Here are some crafty and inexpensive options sure to warm his heart.
These are perfect. My friend Val actually made some coupons for her boyfriend. She spent so much time cutting out construction paper and customizing them that it really shows that she made them from her heart.


A Popsicle Stick Frame
Last year, I decided to get really artistic and made Gerred a popsicle stick photo frame. I decorated the outside of the frame with a skittle bag that I had cut up and put in a picture of the first day Gerred and I met. The skittles were significant because he'd actually thrown skittles at me that day. You can take the most simplest of things and add a personal memory and it becomes something that he'll really like.

A card is always nice especially in this day in age with informal texting and writing on walls. To send someone a card shows you put thought into your gift and shows how important you think someone is. And you honestly don't have to just send your signifigant other a card. You can send a crush as a secret admirer (funny story, I had one in 6th grade) or your friends a card and it'll most likely brighten their day.


Baking
This one is sure to please. You can bake for anyone and they'll think you're the cat's pajamas. Tiny heart pies? They'll think you're a sorcerer.

Mixed CD
Oh yeah, time to pull out the big guns with the mixed CD. Throwing together some love songs is always a crowd pleaser. There's a million love songs out there, but maybe there's just a few that resonate with the two of you that you can jam onto a disk.


Poem
You may not be the Bard of Avon, but I'm sure you can write up a nice acrostic poem or perhaps a few reasons why you love that person. ie. you don't smell bad, you look decent...

Telegram
This one is such a great idea. Though postcard, cards, and letters are wonderful, nothing can beat a telegram. I'm not sure how Gerred did it, but last year he managed to send me a telegram and told me not to open it until the 14th. He got a lot of props for that.

And remember all of Valentines Day's love shouldn't be reserved for just February 14th. Live everyday like it's Valentines Day and treat the people around you with as much love as you can.

Shannon